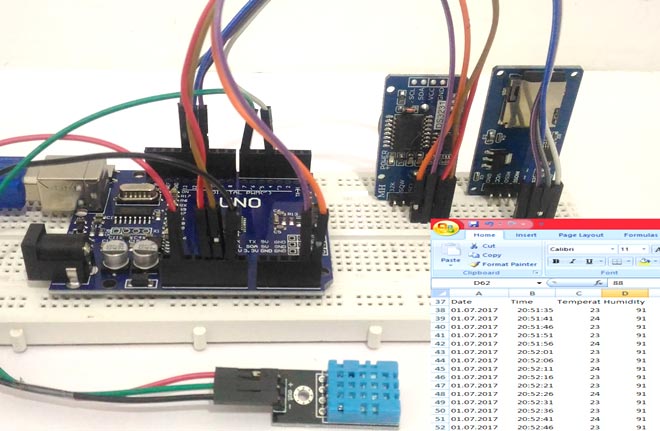
作为工程师/开发人员,我们总是会依靠收集的数据来设计或改进系统。记录数据并进行分析是大多数行业的常见做法,在这里我们将制作一个Arduino数据记录仪项目,通过该项目我们将学习如何在一段特定时间间隔内记录数据。我们将使用一个Arduino开发板读取一些数据(温度、湿度、日期和时间),并且将它们保存在SD卡和计算机上。
保存的数据可以在Excel表格中轻松打开,并进一步分析。为了保留日期和时间,我们将使用通用的RTC模块DS3231,并且使用DHT11传感器获得温度和湿度。在项目的末尾时,您将学习到如何将日期、时间和传感器值等数据记录到SD卡中以及如何通过串行通讯将数据直接写入到Excel表格中。
需要的设备
● 面包板
● Arduino UNO开发板
● DHT11温度传感器
● DS3231 RTC模块
● SD卡模块和SD卡
● 连接导线
● 台式计算机或笔记本
电路原理图
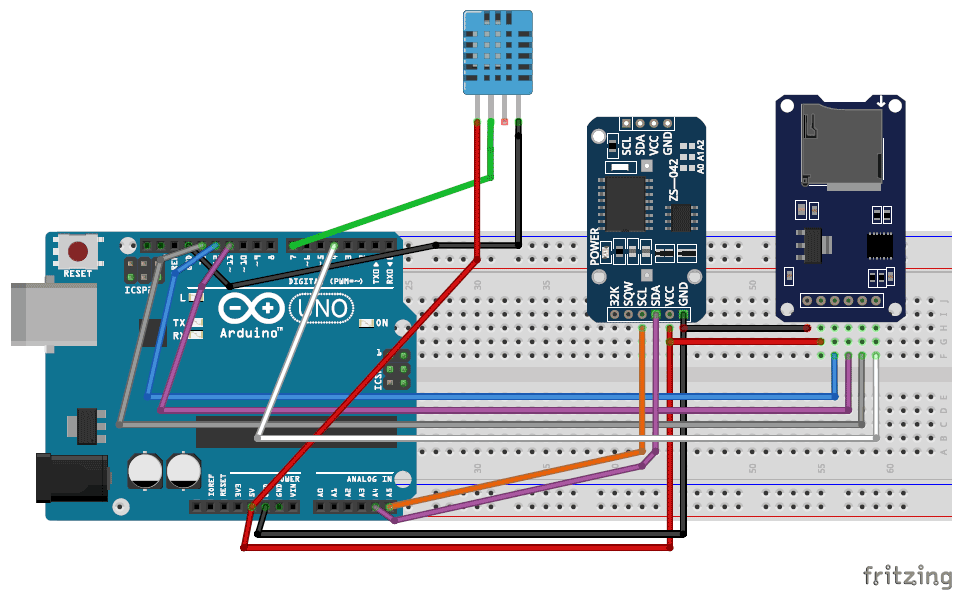
Arduino温度数据记录仪项目的电路图如下所示。
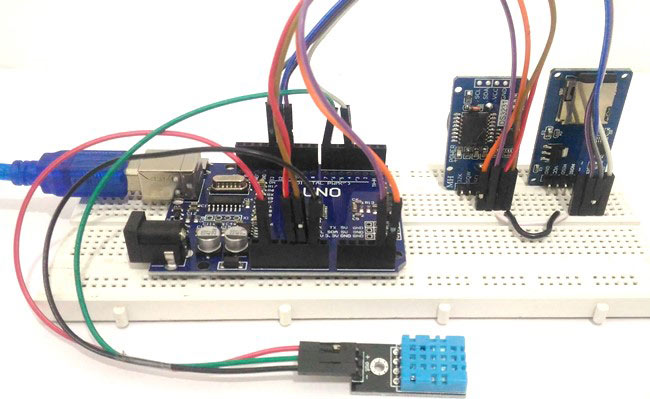
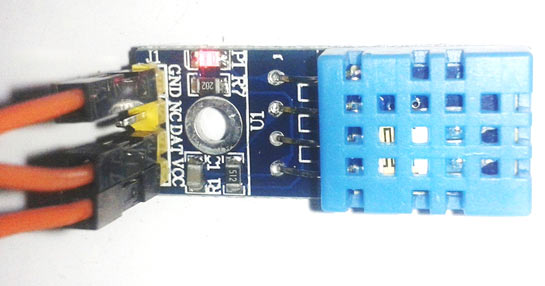
如电路图所示,连接非常简单,由于我们使用的是模块,因此可以直接在面包板上进行制作。详细的连接方式如下表所示:
温度传感器 - DHT11
Arduino开发板引脚
|
模块引脚
|
VCC
|
5V
|
GND
|
GND
|
NC
|
NC
|
OUT
|
7脚
|
RTC模块DS3231
Arduino开发板引脚
|
模块引脚
|
VCC
|
5V
|
GND
|
GND
|
SCL
|
A5引脚
|
SDA
|
A4引脚
|
SD卡模块
Arduino开发板引脚
|
模块引脚
|
VCC
|
5V
|
GND
|
GND
|
MSIO
|
12引脚
|
MOSI
|
引脚11
|
SCK
|
引脚13
|
CS
|
引脚4
|
您可以使用任何传感器来代替DHT11温度传感器。可以参考使用LM35和Arduino读取温度。
RTC模块DS3231使用I2C通信(SCL、SDA)与Arduino连接,SD卡模块使用SPI通信(MISO、MOSI、SCK、CS)进行接口连接。引脚4和引脚7由Arduino程序定义为CS引脚和输出引脚,如果需要,可将其更改为任何其他引脚。。
Arduino程序说明:
我们需要写出以下的Arduino程序:
1. 从DTH11传感器读取数据。
2. 初始化I2C总线以从RTC模块读取数据。
3. 初始化SPI总线,将SD卡模块连接到Arduino接口。
4. 将日期、时间、温度和湿度等数据存入SD卡。
5. 将日期、时间、温度和湿度等数据存储在运行在计算机/笔记本电脑上的Excel工作表上。
上述步骤可能听起来很复杂,但是实现起来非常容易,因为我们可以使用库来帮我们做这些事情。你需要下载以下两个库:
一旦你下载了这个库,可以通过以下方式将它们添加到你的Arduino IDE中
- Sketch->Include Library -> Add .ZIP Library
复制代码
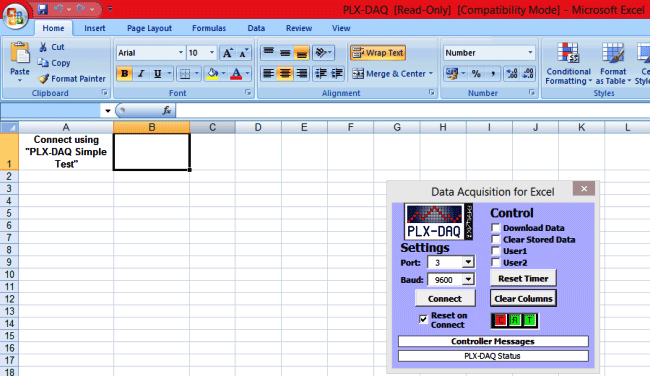
要将Arduino的数据从电脑中提取到Excel表格中,我们还需要安装由Parallax Inc.提供的
PLX-DAQ软件。请按照链接下载文件并根据操作系统进行安装。这应该在桌面上创建一个名为PLS-DAQ的文件夹。稍后在我们将会介绍具体的操作。
现在加入这两个库,安装完软件后,可以使用完整代码,并将其上传到您的Arduino开发板。
1. 从DS3231读取数据:
DS3231是一个RTC(实时时钟)模块。它用于保持日期和时间。该模块具有自己的电池电源,即使在主电源被去除或MCU已经通过硬件复位时,它也能保持日期和时间。所以一旦我们在这个模块中设置日期和时间,它将始终保持。
使用这个模块是非常容易的,因为其由Arduino提供的库。
- // Init the DS3231 using the hardware interface
- DS3231 rtc(SDA, SCL);
- void Initialize_RTC()
- {
- // Initialize the rtc object
- rtc.begin();
- //#### the following lines can be uncommented to set the date and time for the first time###
- /*
- rtc.setDOW(FRIDAY); // Set Day-of-Week to SUNDAY
- rtc.setTime(18, 46, 45); // Set the time to 12:00:00 (24hr format)
- rtc.setDate(6, 30, 2017); // Set the date to January 1st, 2014
- */
- }
复制代码
注意:首次使用本模块时,必须设置日期和时间。可以通过简单地删除上述的注释并编写日期和时间来完成。确保您将其注释并上传,否则每次运行电路板时,将再次设置日期和时间。
2. 从DHT11读取数据:
DHT11是温湿度传感器。它通过模块的输出引脚将温度和湿度值作为8位数据串行发送。该库通过使用Arduino的软件串行功能读取此数据。
- #define DHT11_PIN 7 //Sensor output pin is connected to pin 7
- dht DHT; //Sensor object named as DHT
- void Read_DHT11()
- {
- int chk = DHT.read11(DHT11_PIN);
- }
复制代码
这里我将输出引脚连接到引脚7,也可以选择任何支持软件串行的引脚。调用DHT.read(引脚号);将读取温度和湿度的值,并将其存储在参数DHT.temperature和DHT.Humidity中。
3. 初始化SC卡模块:
- void Initialize_SDcard()
- {
- // see if the card is present and can be initialized:
- if (!SD.begin(chipSelect)) {
- Serial.println("Card failed, or not present");
- // don't do anything more:
- return;
- }
- // open the file. note that only one file can be open at a time,
- // so you have to close this one before opening another.
- File dataFile = SD.open("LoggerCD.txt", FILE_WRITE);
- // if the file is available, write to it:
- if (dataFile) {
- dataFile.println("Date,Time,Temperature,Humidity"); //Write the first row of the excel file
- dataFile.close();
- }
- }
复制代码
Arduino使用SD卡很容易,因为Arduino IDE默认添加了SD卡库。在SD卡初始化功能中,我们将创建一个名为“LoggerCD.txt”的文本文件,并写入我们内容的第一行。这里我们使用“,”作为分隔符分隔值。这意味着我们必须移动到Excel表格中的下一个单元格。
4. 将数据写入SD卡
- void Write_SDcard()
- {
- // open the file. note that only one file can be open at a time,
- // so you have to close this one before opening another.
- File dataFile = SD.open("LoggerCD.txt", FILE_WRITE);
- // if the file is available, write to it:
- if (dataFile) {
- dataFile.print(rtc.getDateStr()); //Store date on SD card
- dataFile.print(","); //Move to next column using a ","
- dataFile.print(rtc.getTimeStr()); //Store date on SD card
- dataFile.print(","); //Move to next column using a ","
- dataFile.print(DHT.temperature); //Store date on SD card
- dataFile.print(","); //Move to next column using a ","
- dataFile.print(DHT.humidity); //Store date on SD card
- dataFile.print(","); //Move to next column using a ","
- dataFile.println(); //End of Row move to next row
- dataFile.close(); //Close the file
- }
- else
- Serial.println("OOPS!! SD card writing failed");
- }
复制代码
如前所述,我们的目的是将日期、时间、温度和湿度保存在我们的SD卡中。在DS3231库和DHT11库的帮助下,我们的Arduino将能够读取所有这四个参数并将其存储到以下参数中,如下表所示:
| 日期 | rtc.getDateStr(); |
| 时间 | rtc.getTimeStr(); |
| 温度 | DHT.temperature |
| 湿度 | DHT.humidity |
现在我们可以直接使用这些参数,使用打印行将它们存储在SD卡上
- dataFile.print(parameter);
复制代码
您可以注意到,每个参数用逗号分隔,使其看起来清晰可见,并且dataFile.println();用于指示行的结尾。
5. 将数据写入PLX-DAQ
PLX-DAQ软件是Microsoft Excel插件,可帮助我们将Arduino的值直接写入笔记本电脑或PC上的Excel文件。我比较喜欢这个软件,主要是因为两个原因:
1. 您可以同时写入和监控数据,并可以根据这些数据绘制图形。
2. 您不需要像DS3231这样的RTC模块来跟踪日期和时间。您只需使用笔记本电脑/计算机上运行的日期和时间,并将其直接保存在Excel中。
要想将此软件与Arduino一起使用,我们必须以特定的模式串行发送数据,就像在串行监视器上显示值一样。主要内容如下:
- void Initialize_PlxDaq()
- {
- Serial.println("CLEARDATA"); //clears up any data left from previous projects
- Serial.println("LABEL,Date,Time,Temperature,Humidity"); //always write LABEL, to indicate it as first line
- }
- void Write_PlxDaq()
- {
- Serial.print("DATA"); //always write "DATA" to Inidicate the following as Data
- Serial.print(","); //Move to next column using a ","
- Serial.print("DATE"); //Store date on Excel
- Serial.print(","); //Move to next column using a ","
- Serial.print("TIME"); //Store date on Excel
- Serial.print(","); //Move to next column using a ","
- Serial.print(DHT.temperature); //Store date on Excel
- Serial.print(","); //Move to next column using a ","
- Serial.print(DHT.humidity); //Store date on Excel
- Serial.print(","); //Move to next column using a ","
- Serial.println(); //End of Row move to next row
- }
复制代码
该软件可以识别LABEL、DATA、TIME、DATE等关键字。如初始化函数中所示,关键字“LABEL”用于写入Excel表格的第一个ROW。在写函数后面,我们使用关键字“DATA”来表示以下信息应被视为DATA。为了表明我们必须移动到下一行,我们必须使用逗号(“,”)。为了指示行的结尾,我们必须发送一个Serial.println();
如前所述,我们可以通过分别发送关键字“DATE”和“TIME”来写入系统日期和时间,如上所示。
注意:使用此PLX_DAQ软件时,请勿使用串口监视器。
工作原理说明
Arduino数据记录仪的工作过程很简单。一旦硬件和软件准备就绪,就可以将程序烧写到Arduino开发板中。当您的程序上传完成后,温度和湿度值将开始存储在SD卡中。您必须按照以下步骤启用PLX-DAQ记录到计算机中的Excel工作表。
步骤1:打开安装过程中在桌面上创建的“Plx-Daq Spreadsheet”文件。
步骤2:如果有安全模块,请单击Options->Enable the content -> Finish -> OK,显示以下界面。
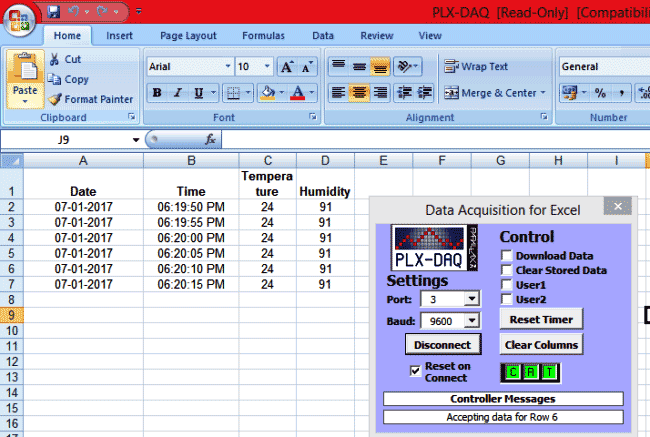
步骤3:现在选择波特率为“9600”和Arduino开发板连接到计算机映射的端口,然后单击Connect。您的值应该会开始记录,如下图所示。
您可以打开excel表并监视它们记录的值。我们的SD卡也将保存相同的值。要检查其是否正常工作,只需去掉SD卡并将其在您的计算机上打开。您应该在其中找到一个名为“LoggerCD.txt”的文本文件。打开文件如所示:
这个文件有数据,但是很难在记事本上分析它们。因此,我们可以在Excel中以CSV(逗号分隔值)文件的形式打开它,从而使其更有效。
1. 打开Excel。单击File->Open,选择右下角的“All file”,从SD卡中选择“LoggerCD”文件。这将打开一个文本导入向导。
2. 点击“Next”,选择逗号作为分隔符。再次点击“Next”。然后完成。
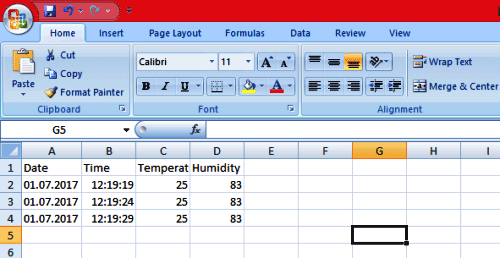
3. 现在,您的值将在Excel文件中打开,如下所示
我已经记录了每5秒钟的值。您可以通过更改程序中的延迟函数设置记录的时间间隔。
代码
- /*
- * Program to demonstrate Data Logging/Visualisation using Arduino
- *
- * ###Connection with SD card module###
- * Vcc->5V
- * Gnd->Gnd
- * MISO->pin 12
- * MOSI->pin 11
- * SCK-> pin 13
- * CS-> pin 4
- *
- * ###Connection with DS3231###
- * Vcc->5V
- * Gns->Gnd
- * SCL->pin A5
- * SDA-> pin A4
- *
- * ###Connection with DT11###
- * Vcc->5V
- * Gnd->Gnd
- * Out-> pin 7
- *
- *
- */
- #include <DS3231.h> //Library for RTC module (Download from Link in article)
- #include <SPI.h> //Library for SPI communication (Pre-Loaded into Arduino)
- #include <SD.h> //Library for SD card (Pre-Loaded into Arduino)
- #include <dht.h> //Library for dht11 Temperature and Humidity sensor (Download from Link in article)
- #define DHT11_PIN 7 //Sensor output pin is connected to pin 7
- dht DHT; //Sensor object named as DHT
- const int chipSelect = 4; //SD card CS pin connected to pin 4 of Arduino
- // Init the DS3231 using the hardware interface
- DS3231 rtc(SDA, SCL);
- void setup()
- {
- // Setup Serial connection
- Serial.begin(9600);
- Initialize_SDcard();
- Initialize_RTC();
- Initialize_PlxDaq();
- }
- void loop()
- {
- Read_DHT11();
- Write_SDcard();
- Write_PlxDaq();
- delay(5000); //Wait for 5 seconds before writing the next data
- }
- void Write_PlxDaq()
- {
- Serial.print("DATA"); //always write "DATA" to Indicate the following as Data
- Serial.print(","); //Move to next column using a ","
- Serial.print("DATE"); //Store date on Excel
- Serial.print(","); //Move to next column using a ","
- Serial.print("TIME"); //Store date on Excel
- Serial.print(","); //Move to next column using a ","
- Serial.print(DHT.temperature); //Store date on Excel
- Serial.print(","); //Move to next column using a ","
- Serial.print(DHT.humidity); //Store date on Excel
- Serial.print(","); //Move to next column using a ","
- Serial.println(); //End of Row move to next row
- }
- void Initialize_PlxDaq()
- {
- Serial.println("CLEARDATA"); //clears up any data left from previous projects
- Serial.println("LABEL,Date,Time,Temperature,Humidity"); //always write LABEL, to indicate it as first line
- }
- void Write_SDcard()
- {
- // open the file. note that only one file can be open at a time,
- // so you have to close this one before opening another.
- File dataFile = SD.open("LoggerCD.txt", FILE_WRITE);
- // if the file is available, write to it:
- if (dataFile) {
- dataFile.print(rtc.getDateStr()); //Store date on SD card
- dataFile.print(","); //Move to next column using a ","
- dataFile.print(rtc.getTimeStr()); //Store date on SD card
- dataFile.print(","); //Move to next column using a ","
- dataFile.print(DHT.temperature); //Store date on SD card
- dataFile.print(","); //Move to next column using a ","
- dataFile.print(DHT.humidity); //Store date on SD card
- dataFile.print(","); //Move to next column using a ","
- dataFile.println(); //End of Row move to next row
- dataFile.close(); //Close the file
- }
- else
- Serial.println("OOPS!! SD card writing failed");
- }
- void Initialize_SDcard()
- {
- // see if the card is present and can be initialized:
- if (!SD.begin(chipSelect)) {
- Serial.println("Card failed, or not present");
- // don't do anything more:
- return;
- }
- // open the file. note that only one file can be open at a time,
- // so you have to close this one before opening another.
- File dataFile = SD.open("LoggerCD.txt", FILE_WRITE);
- // if the file is available, write to it:
- if (dataFile) {
- dataFile.println("Date,Time,Temperature,Humidity"); //Write the first row of the excel file
- dataFile.close();
- }
- }
- void Initialize_RTC()
- {
- // Initialize the rtc object
- rtc.begin();
- //#### The following lines can be uncommented to set the date and time for the first time###
- /*
- rtc.setDOW(FRIDAY); // Set Day-of-Week to SUNDAY
- rtc.setTime(18, 46, 45); // Set the time to 12:00:00 (24hr format)
- rtc.setDate(6, 30, 2017); // Set the date to January 1st, 2014
- */
- }
- void Read_DHT11()
- {
- int chk = DHT.read11(DHT11_PIN);
- }
- /*void Read_DateTime()
- {
- // Send date
- Serial.print(rtc.getDateStr());
- Serial.print(" -- ");
- // Send time
- Serial.println(rtc.getTimeStr());
- }*/
- /*void Read_TempHum()
- {
- Serial.print("Temperature = ");
- Serial.println(DHT.temperature);
- Serial.print("Humidity = ");
- Serial.println(DHT.humidity);
- // delay(1000);
- }*/
复制代码

没有评论:
发表评论